
| 일 | 월 | 화 | 수 | 목 | 금 | 토 |
|---|---|---|---|---|---|---|
| 1 | 2 | 3 | 4 | 5 | 6 | 7 |
| 8 | 9 | 10 | 11 | 12 | 13 | 14 |
| 15 | 16 | 17 | 18 | 19 | 20 | 21 |
| 22 | 23 | 24 | 25 | 26 | 27 | 28 |
| 29 | 30 | 31 |
- ADP
- 장고 기초 강의
- 파이썬 장고
- docker
- mlops
- Python
- airflow
- Django
- 개발자
- 도커
- 기초강의
- 에어플로우 기초강의
- c++
- C언어
- c
- 플라스크
- 개발자취업
- 장고 튜토리얼
- 인공지능
- 웹개발
- 프로그래밍
- 파이썬
- flask
- 도커 컴포즈
- 쇼핑몰예제
- 파이썬강의
- 장고
- cpp
- 예제프로젝트
- 개발언어
- Today
- Total
TITEDIOS Dev Note
[MLOps] 10강 - 멀티노드(Multi-node)에서 Airflow 구축 (1) [Airflow Multi-Node System 구축 가이드 및 사례] 본문
[MLOps] 10강 - 멀티노드(Multi-node)에서 Airflow 구축 (1) [Airflow Multi-Node System 구축 가이드 및 사례]
TitediosKW 2025. 1. 17. 19:00
목차
- Multi-node Airflow Architecture
- Multi-node 환경 구축
- Multi-node에 맞게 docker-compose.yaml 수정
- 결론
Apache Airflow는 워크플로우 관리 및 스케줄링을 위한 오픈소스 툴로, 다양한 작업을 정의하고 실행할 수 있습니다. 기본적으로 Airflow는 단일 노드 환경에서도 동작하지만, 다수의 작업을 병렬로 처리하거나 대규모 환경에서 확장성을 확보하기 위해서는 멀티 노드(Multi-node) 아키텍처가 필요합니다. 이번 글에서는 Airflow의 Multi-node 아키텍처와 이를 구축하기 위한 방법, 그리고 docker-compose.yaml 파일을 Multi-node 환경에 맞게 수정하는 방법을 살펴보겠습니다.
1. Multi-node Airflow Architecture
우리가 구축하려는 Multi-node의 Airflow의 아키텍처를 그림으로 표현해 보겠습니다.
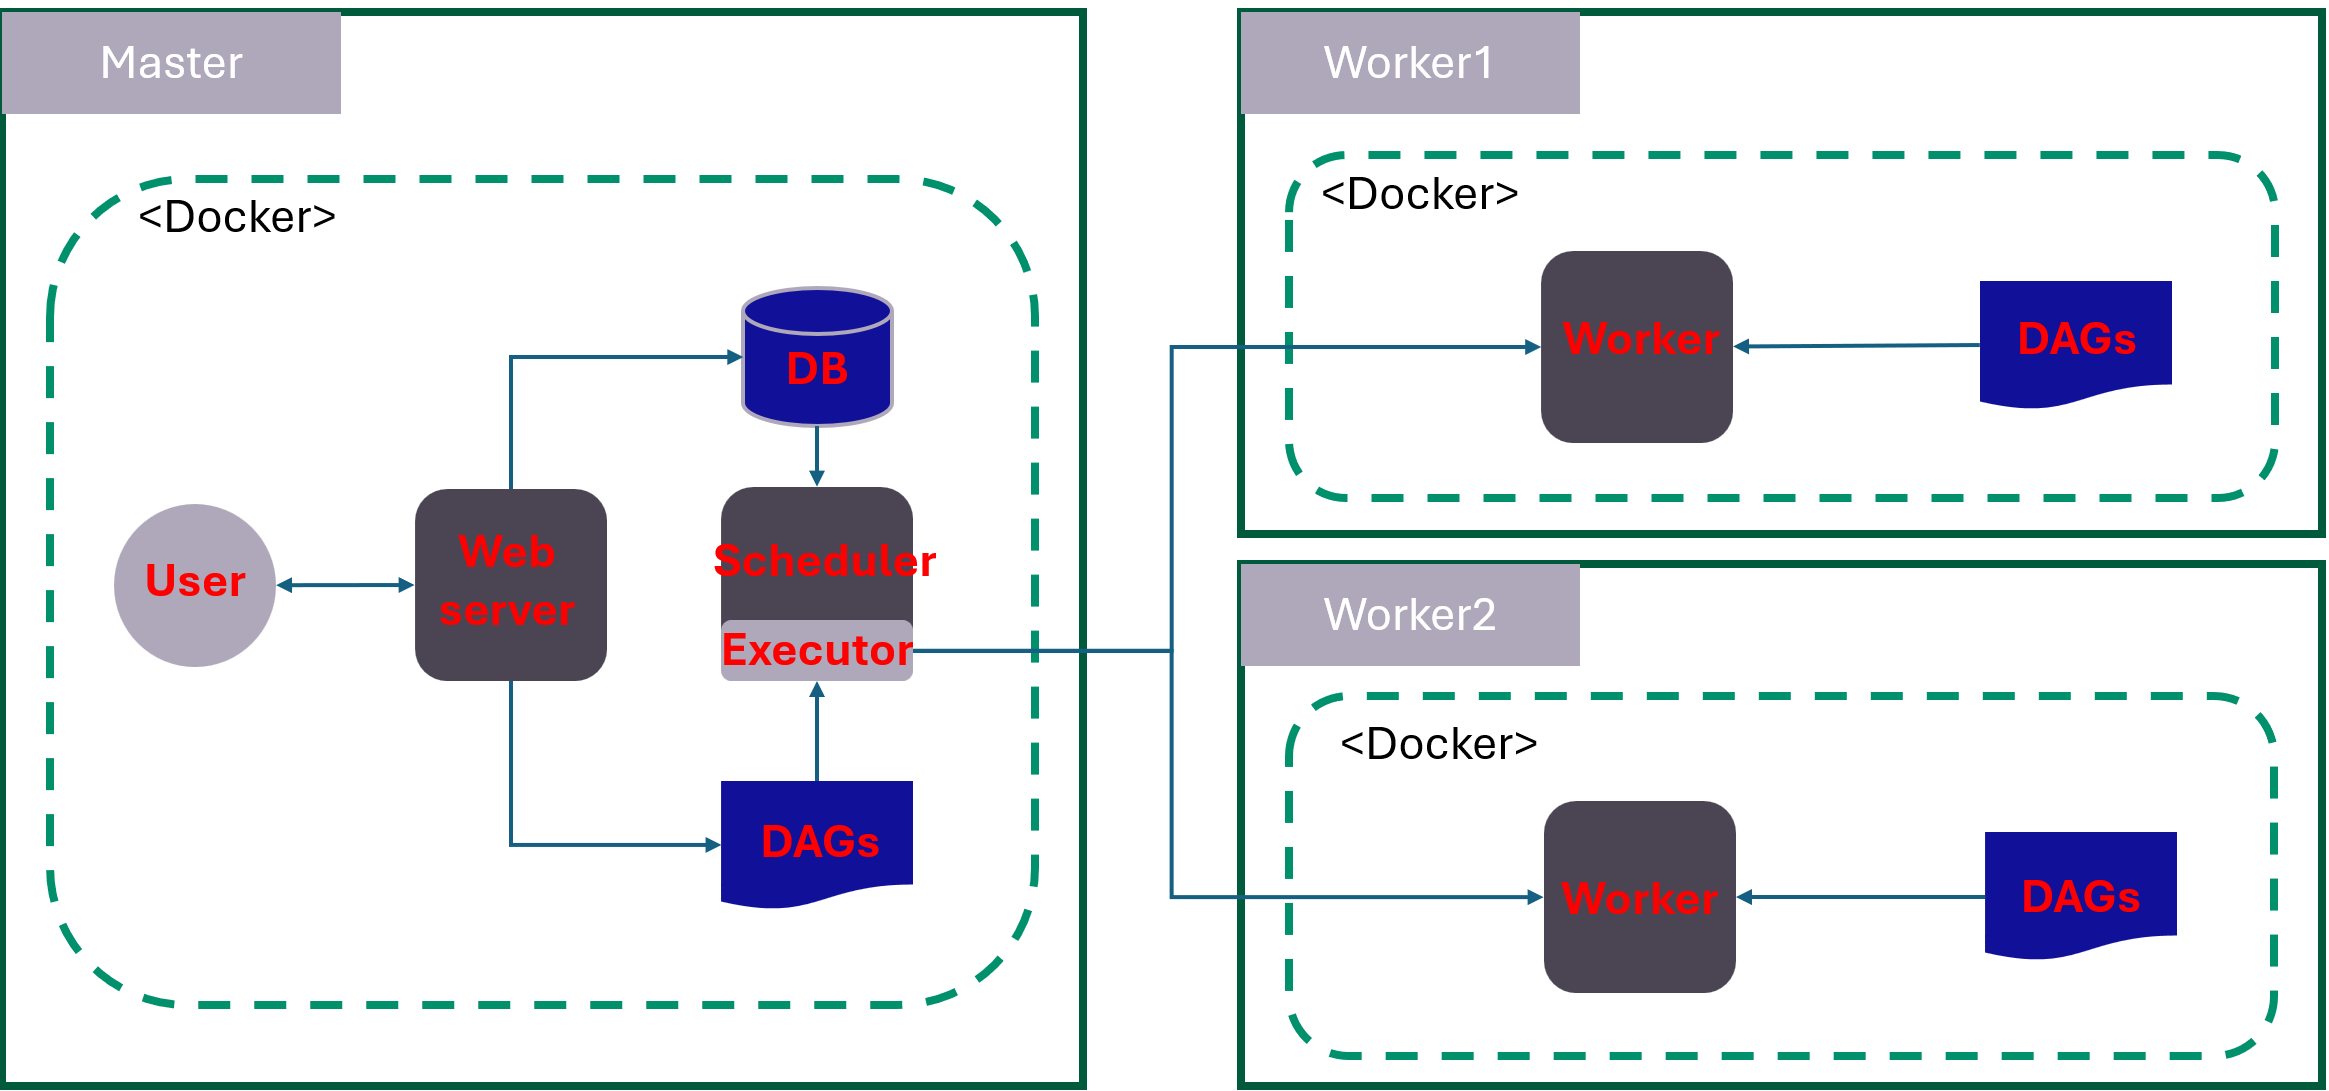
위 그림에서 보면 Master, worker1, 그리고 worker2로 Node가 3개가 있습니다. 3개의 노드를 만들고 그 위에 Airflow의 요소들을 배치할 것입니다. 각각의 노드에는 아래와 같은 컴포넌트가 있습니다.
Master에 구축할 컴포넌트
Master에는 Airflow의 주요 요소들을 대부분 구축해 놓습니다. 각 요소는 다음과 같습니다.
- (Web Server) User와 인터페이스를 담당하는 부분.
- (Scheduler) 작업에 대한 스케줄링을 수행하는 요소.
- (Executor) 스케줄링에 따라 작업을 실제로 Worker로 보내 실행하는 역할을 수행.
- (Database) Meta 정보를 저장하는 데이터베이스.
- (Dags) Airflow가 사용할 Dag를 저장하는 디렉토리.
Worker에 구축할 컴포넌트
- (Worker) 개발된 Dag에 따라 작업을 수행하는 실제 요소.
- (Dags) Airflow가 사용할 Dag를 저장하는 디렉토리.
2. Multi-node 환경 구축
Worker에 docker 설치
Worker에 Docker를 설치해야 합니다. 설치 과정은 이전에 Docker 설치에 관련된 글을 참고하시면 좋겠습니다.
[MLOps] 6강 - Docker 설치 및 docker-compose.yaml 작성 (1) (Airflow Multi-Node System 구축 가이드 및 사례)
목차Docker 설치Docker 설치 후 과정Airflow Multi-node를 위한 docker-compose.yaml 작성결론Multi-node 환경에서 Airflow를 설정하면 작업 부하를 분산하고 시스템 성능을 향상할 수 있습니다. MLOps 시스템을 만들
cozy-dev-area.tistory.com
Node 간 연결 확인
우선 각 노드의 IP를 알아야 합니다. 이전에 Node를 생성할 때 Master, Worker1, Worker2 노드 각각의 IP를 10.0.2.100, 10.0.2.101, 10.0.2.102로 설정하였습니다. 다른 IP로 설정했다면 ifconfig 명령으로 확인이 가능합니다. 특정 노드에서 다른 노드로 ping 이 되는지 확인하겠습니다. ping을 3번씩 보내는 옵션을 설정하고 명령을 실행해 봅시다.
# master
ping ${worker1_ip} -c 3
ping ${worker2_ip} -c 3

ping 10.0.2.101 -c 3
ping 10.0.2.102 -c 3
# worker1
ping ${master_ip} -c 3
ping ${worker2_ip} -c 3

ping 10.0.2.100 -c 3
ping 10.0.2.102 -c 3
# worker2
ping ${master_ip} -c 3
ping ${worker1_ip} -c 3

ping 10.0.2.100 -c 3
ping 10.0.2.101 -c 3
3. Multi-node에 맞게 docker-compose.yaml 수정
이전에 단일 노드에서 Airflow를 실행시킬 때 사용했던 docker-compose.yaml 파일을 수정하여 멀티 노드(Multi-Node)에 맞게 수정하겠습니다.
공통부분 수정
공통부분을 수정하겠습니다. 수정한 부분만 간략하게 살펴보면 MASTER_NODE_IP 부분이 수정되었습니다. 그리고 보안을 위한 FERNET_KEY, SECRET_KEY를 추가하였습니다. 그리고 Airflow의 DAGs example을 보이지 않게 하기 위해 IRFLOW__CORE__LOAD_EXAMPLES 설정을 false로 변경합니다. 예제를 보고 싶으시면 true로 두면 됩니다. 다만, 예제가 많기 때문에 여러분이 작성한 DAG를 쉽게 확인하기 위해 false로 설정하려고 합니다.
x-airflow-common:
  ...
  environment:
    &airflow-common-env
    AIRFLOW__CORE__PARALLELISM: 64
    AIRFLOW__CORE__MAX_ACTIVE_TASKS_PER_DAG: 32
    AIRFLOW__SCHEDULER__PARSING_PROCESSES: 4
    AIRFLOW__CORE__EXECUTOR: CeleryExecutor
    AIRFLOW__CELERY__WORKER_CONCURRENCY: 8
    AIRFLOW__CORE__SQL_ALCHEMY_CONN: postgresql+psycopg2://airflow:airflow@${MASTER_NODE_IP}/airflow
    AIRFLOW__CELERY__RESULT_BACKEND: db+postgresql://airflow:airflow@${MASTER_NODE_IP}/airflow
    AIRFLOW__CELERY__BROKER_URL: redis://:@${MASTER_NODE_IP}:6379/0
    AIRFLOW__CORE__FERNET_KEY: ${FERNET_KEY}
    AIRFLOW__WEBSERVER__SECRET_KEY: ${SECRET_KEY}
    AIRFLOW__CORE__LOAD_EXAMPLES: 'false'
    AIRFLOW__API__AUTH_BACKENDS: 'airflow.api.auth.backend.basic_auth,airflow.api.auth.backend.session'
    ...
  extra_hosts:
    - "WORKER001:${WORKER_01_IP}"
    - "WORKER002:${WORKER_02_IP}"
...
postgresql & redis 서비스 설정
DB와 Queue 서비스를 실행하기 위해 docker-compose.yaml에 정의된 부분 중 포트(port)만 변경합니다. 특별한 변경 사항은 없습니다.
airflow-webserver, airflow-scheduler, airflow-triggerer 서비스 설정
세 가지 서비스에 대해 의존성을 변경해 주어야 합니다. 이 세 가지 서비스는 redis, postres, airflow-init 서비스가 실행된 후에 실행될 수 있으므로 우선 수행되어야 하는 서비스가 먼저 실행된 후 그다음 실행되도록 설정해 주는 것입니다.
...
    depends_on:
      redis:
        condition: service_healthy
      postgres:
        condition: service_healthy
      airflow-init:
        condition: service_completed_successfully
airflow-worker 서비스 설정
worker에 대한 서비스를 설정하겠습니다. 워커는 호스트이름에 대한 설정이 필요합니다. 그리고 기존에 설정되어 있는 의존성을 제거해 줍니다. worker 노드에서 동작하면 postgres, redis 서비스는 존재하지 않기 때문에 의존성 제거가 필요합니다.
  airflow-worker:
    <<: *airflow-common
    command: celery worker
    hostname: ${HOSTNAME}
    ports:
      - 8793:8793
    healthcheck:
      # yamllint disable rule:line-length
      test:
        - "CMD-SHELL"
        - 'celery --app airflow.providers.celery.executors.celery_executor.app inspect ping -d "celery@$${HOSTNAME}" || celery --app airflow.executors.celery_executor.app inspect ping -d "celery@$${HOSTNAME}"'
      interval: 30s
      timeout: 10s
      retries: 5
      start_period: 30s
    environment:
      <<: *airflow-common-env
      # Required to handle warm shutdown of the celery workers properly
      # See https://airflow.apache.org/docs/docker-stack/entrypoint.html#signal-propagation
      DUMB_INIT_SETSID: "0"
    restart: always
전체 docker-compose.yaml 파일
변경한 전체 파일입니다. 길지만 복사해서 하나씩 살펴보신다면 그렇게 어렵지만은 않게 느껴지실 것입니다.
# Licensed to the Apache Software Foundation (ASF) under one
# or more contributor license agreements.  See the NOTICE file
# distributed with this work for additional information
# regarding copyright ownership.  The ASF licenses this file
# to you under the Apache License, Version 2.0 (the
# "License"); you may not use this file except in compliance
# with the License.  You may obtain a copy of the License at
#
#   http://www.apache.org/licenses/LICENSE-2.0
#
# Unless required by applicable law or agreed to in writing,
# software distributed under the License is distributed on an
# "AS IS" BASIS, WITHOUT WARRANTIES OR CONDITIONS OF ANY
# KIND, either express or implied.  See the License for the
# specific language governing permissions and limitations
# under the License.
#

# Basic Airflow cluster configuration for CeleryExecutor with Redis and PostgreSQL.
#
# WARNING: This configuration is for local development. Do not use it in a production deployment.
#
# This configuration supports basic configuration using environment variables or an .env file
# The following variables are supported:
#
# AIRFLOW_IMAGE_NAME           - Docker image name used to run Airflow.
#                                Default: apache/airflow:2.10.3
# AIRFLOW_UID                  - User ID in Airflow containers
#                                Default: 50000
# AIRFLOW_PROJ_DIR             - Base path to which all the files will be volumed.
#                                Default: .
# Those configurations are useful mostly in case of standalone testing/running Airflow in test/try-out mode
#
# _AIRFLOW_WWW_USER_USERNAME   - Username for the administrator account (if requested).
#                                Default: airflow
# _AIRFLOW_WWW_USER_PASSWORD   - Password for the administrator account (if requested).
#                                Default: airflow
# _PIP_ADDITIONAL_REQUIREMENTS - Additional PIP requirements to add when starting all containers.
#                                Use this option ONLY for quick checks. Installing requirements at container
#                                startup is done EVERY TIME the service is started.
#                                A better way is to build a custom image or extend the official image
#                                as described in https://airflow.apache.org/docs/docker-stack/build.html.
#                                Default: ''
#
# Feel free to modify this file to suit your needs.
---
x-airflow-common:
  &airflow-common
  # In order to add custom dependencies or upgrade provider packages you can use your extended image.
  # Comment the image line, place your Dockerfile in the directory where you placed the docker-compose.yaml
  # and uncomment the "build" line below, Then run `docker-compose build` to build the images.
  image: ${AIRFLOW_IMAGE_NAME:-apache/airflow:2.10.3}
  # build: .
  environment:
    &airflow-common-env
    AIRFLOW__CORE__PARALLELISM: 64
    AIRFLOW__CORE__MAX_ACTIVE_TASKS_PER_DAG: 32
    AIRFLOW__SCHEDULER__PARSING_PROCESSES: 4
    AIRFLOW__CORE__EXECUTOR: CeleryExecutor
    AIRFLOW__CELERY__WORKER_CONCURRENCY: 8
    AIRFLOW__CORE__SQL_ALCHEMY_CONN: postgresql+psycopg2://airflow:airflow@${MASTER_NODE_IP}/airflow
    AIRFLOW__CELERY__RESULT_BACKEND: db+postgresql://airflow:airflow@${MASTER_NODE_IP}/airflow
    AIRFLOW__CELERY__BROKER_URL: redis://:@${MASTER_NODE_IP}:6379/0
    AIRFLOW__CORE__FERNET_KEY: ${FERNET_KEY}
    AIRFLOW__WEBSERVER__SECRET_KEY: ${SECRET_KEY}
    #AIRFLOW__CORE__EXECUTOR: CeleryExecutor
    #AIRFLOW__DATABASE__SQL_ALCHEMY_CONN: postgresql+psycopg2://airflow:airflow@postgres/airflow
    #AIRFLOW__CELERY__RESULT_BACKEND: db+postgresql://airflow:airflow@postgres/airflow
    #AIRFLOW__CELERY__BROKER_URL: redis://:@redis:6379/0
    #AIRFLOW__CORE__FERNET_KEY: ''
    AIRFLOW__CORE__DAGS_ARE_PAUSED_AT_CREATION: 'true'
    AIRFLOW__CORE__LOAD_EXAMPLES: 'false'
    AIRFLOW__API__AUTH_BACKENDS: 'airflow.api.auth.backend.basic_auth,airflow.api.auth.backend.session'
    # yamllint disable rule:line-length
    # Use simple http server on scheduler for health checks
    # See https://airflow.apache.org/docs/apache-airflow/stable/administration-and-deployment/logging-monitoring/check-health.html#scheduler-health-check-server
    # yamllint enable rule:line-length
    AIRFLOW__SCHEDULER__ENABLE_HEALTH_CHECK: 'true'
    # WARNING: Use _PIP_ADDITIONAL_REQUIREMENTS option ONLY for a quick checks
    # for other purpose (development, test and especially production usage) build/extend Airflow image.
    _PIP_ADDITIONAL_REQUIREMENTS: ${_PIP_ADDITIONAL_REQUIREMENTS:-}
    # The following line can be used to set a custom config file, stored in the local config folder
    # If you want to use it, outcomment it and replace airflow.cfg with the name of your config file
    # AIRFLOW_CONFIG: '/opt/airflow/config/airflow.cfg'
  extra_hosts:
    - "WORKER001:${WORKER_01_IP}"
    - "WORKER002:${WORKER_02_IP}"
  volumes:
    - ${AIRFLOW_PROJ_DIR:-.}/dags:/opt/airflow/dags
    - ${AIRFLOW_PROJ_DIR:-.}/logs:/opt/airflow/logs
    - ${AIRFLOW_PROJ_DIR:-.}/config:/opt/airflow/config
    - ${AIRFLOW_PROJ_DIR:-.}/plugins:/opt/airflow/plugins
  user: "${AIRFLOW_UID:-50000}:0"

services:
  postgres:
    image: postgres:13
    environment:
      POSTGRES_USER: airflow
      POSTGRES_PASSWORD: airflow
      POSTGRES_DB: airflow
    ports:
      - 5432:5432
    volumes:
      - postgres-db-volume:/var/lib/postgresql/data
    healthcheck:
      test: ["CMD", "pg_isready", "-U", "airflow"]
      interval: 10s
      retries: 5
      start_period: 5s
    restart: always

  redis:
    # Redis is limited to 7.2-bookworm due to licencing change
    # https://redis.io/blog/redis-adopts-dual-source-available-licensing/
    image: redis:7.2-bookworm
    ports:
      - 6379:6379
    healthcheck:
      test: ["CMD", "redis-cli", "ping"]
      interval: 10s
      timeout: 30s
      retries: 50
      start_period: 30s
    restart: always

  airflow-webserver:
    <<: *airflow-common
    command: webserver
    ports:
      - "8080:8080"
    healthcheck:
      test: ["CMD", "curl", "--fail", "http://localhost:8080/health"]
      interval: 30s
      timeout: 10s
      retries: 5
      start_period: 30s
    restart: always
    depends_on:
      redis:
        condition: service_healthy
      postgres:
        condition: service_healthy
      airflow-init:
        condition: service_completed_successfully

  airflow-scheduler:
    <<: *airflow-common
    command: scheduler
    healthcheck:
      test: ["CMD", "curl", "--fail", "http://localhost:8974/health"]
      interval: 30s
      timeout: 10s
      retries: 5
      start_period: 30s
    restart: always
    depends_on:
      redis:
        condition: service_healthy
      postgres:
        condition: service_healthy
      airflow-init:
        condition: service_completed_successfully

  airflow-worker:
    <<: *airflow-common
    command: celery worker
    hostname: ${HOSTNAME}
    ports:
      - 8793:8793
    healthcheck:
      # yamllint disable rule:line-length
      test:
        - "CMD-SHELL"
        - 'celery --app airflow.providers.celery.executors.celery_executor.app inspect ping -d "celery@$${HOSTNAME}" || celery --app airflow.executors.celery_executor.app inspect ping -d "celery@$${HOSTNAME}"'
      interval: 30s
      timeout: 10s
      retries: 5
      start_period: 30s
    environment:
      <<: *airflow-common-env
      # Required to handle warm shutdown of the celery workers properly
      # See https://airflow.apache.org/docs/docker-stack/entrypoint.html#signal-propagation
      DUMB_INIT_SETSID: "0"
    restart: always

  airflow-triggerer:
    <<: *airflow-common
    command: triggerer
    healthcheck:
      test: ["CMD-SHELL", 'airflow jobs check --job-type TriggererJob --hostname "$${HOSTNAME}"']
      interval: 30s
      timeout: 10s
      retries: 5
      start_period: 30s
    restart: always
    depends_on:
      airflow-init:
        condition: service_completed_successfully

  airflow-init:
    <<: *airflow-common
    entrypoint: /bin/bash
    # yamllint disable rule:line-length
    command:
      - -c
      - |
        if [[ -z "${AIRFLOW_UID}" ]]; then
          echo
          echo -e "\033[1;33mWARNING!!!: AIRFLOW_UID not set!\e[0m"
          echo "If you are on Linux, you SHOULD follow the instructions below to set "
          echo "AIRFLOW_UID environment variable, otherwise files will be owned by root."
          echo "For other operating systems you can get rid of the warning with manually created .env file:"
          echo "    See: https://airflow.apache.org/docs/apache-airflow/stable/howto/docker-compose/index.html#setting-the-right-airflow-user"
          echo
        fi
        one_meg=1048576
        mem_available=$$(($$(getconf _PHYS_PAGES) * $$(getconf PAGE_SIZE) / one_meg))
        cpus_available=$$(grep -cE 'cpu[0-9]+' /proc/stat)
        disk_available=$$(df / | tail -1 | awk '{print $$4}')
        warning_resources="false"
        if (( mem_available < 4000 )) ; then
          echo
          echo -e "\033[1;33mWARNING!!!: Not enough memory available for Docker.\e[0m"
          echo "At least 4GB of memory required. You have $$(numfmt --to iec $$((mem_available * one_meg)))"
          echo
          warning_resources="true"
        fi
        if (( cpus_available < 2 )); then
          echo
          echo -e "\033[1;33mWARNING!!!: Not enough CPUS available for Docker.\e[0m"
          echo "At least 2 CPUs recommended. You have $${cpus_available}"
          echo
          warning_resources="true"
        fi
        if (( disk_available < one_meg * 10 )); then
          echo
          echo -e "\033[1;33mWARNING!!!: Not enough Disk space available for Docker.\e[0m"
          echo "At least 10 GBs recommended. You have $$(numfmt --to iec $$((disk_available * 1024 )))"
          echo
          warning_resources="true"
        fi
        if [[ $${warning_resources} == "true" ]]; then
          echo
          echo -e "\033[1;33mWARNING!!!: You have not enough resources to run Airflow (see above)!\e[0m"
          echo "Please follow the instructions to increase amount of resources available:"
          echo "   https://airflow.apache.org/docs/apache-airflow/stable/howto/docker-compose/index.html#before-you-begin"
          echo
        fi
        mkdir -p /sources/logs /sources/dags /sources/plugins
        chown -R "${AIRFLOW_UID}:0" /sources/{logs,dags,plugins}
        exec /entrypoint airflow version
    # yamllint enable rule:line-length
    environment:
      <<: *airflow-common-env
      _AIRFLOW_DB_MIGRATE: 'true'
      _AIRFLOW_WWW_USER_CREATE: 'true'
      _AIRFLOW_WWW_USER_USERNAME: ${_AIRFLOW_WWW_USER_USERNAME:-airflow}
      _AIRFLOW_WWW_USER_PASSWORD: ${_AIRFLOW_WWW_USER_PASSWORD:-airflow}
      _PIP_ADDITIONAL_REQUIREMENTS: ''
    user: "0:0"
    volumes:
      - ${AIRFLOW_PROJ_DIR:-.}:/sources
    depends_on:
      redis:
        condition: service_healthy
      postgres:
        condition: service_healthy

  airflow-cli:
    <<: *airflow-common
    profiles:
      - debug
    environment:
      <<: *airflow-common-env
      CONNECTION_CHECK_MAX_COUNT: "0"
    # Workaround for entrypoint issue. See: https://github.com/apache/airflow/issues/16252
    command:
      - bash
      - -c
      - airflow

  # You can enable flower by adding "--profile flower" option e.g. docker-compose --profile flower up
  # or by explicitly targeted on the command line e.g. docker-compose up flower.
  # See: https://docs.docker.com/compose/profiles/
  flower:
    <<: *airflow-common
    command: celery flower
    profiles:
      - flower
    ports:
      - "5555:5555"
    healthcheck:
      test: ["CMD", "curl", "--fail", "http://localhost:5555/"]
      interval: 30s
      timeout: 10s
      retries: 5
      start_period: 30s
    restart: always
    depends_on:
      airflow-init:
        condition: service_completed_successfully

volumes:
  postgres-db-volume:
결론
Multi-node 아키텍처는 Airflow의 확장성과 가용성을 높이는 데 필수적입니다. 이 글에서 다룬 Multi-node 환경 구축 절차와 docker-compose.yaml 파일 수정 방법을 통해 더 효율적이고 안정적인 Airflow 환경을 구성할 수 있습니다. 워크로드가 증가함에 따라 적절히 노드를 추가하거나 리소스를 조정해 최적의 성능을 유지할 수 있습니다.
궁금한 점이나 추가로 다루었으면 하는 주제가 있다면 댓글로 남겨 주세요.
도움이 되셨다면 공감 부탁드리겠습니다. 여러분의 공감이 정말 큰 힘이 됩니다.
감사합니다! 🙌


